Rabu, 03 Juli 2019

6.4.1.3. Packet Tracer Configure Initial Router Setting


1.    Open Packet Tracer 6.4.1.3 – Configure Initial Router Setting
   

Part 1:   Verify the Default Router Configuration
Step 1:  Establish a console connection to R1.
a.    Choose a Console cable from the available connections.


b.    Click PCA and select RS 232.

c.     Click R1 and select Console.
d.    Click PCA > Desktop tab > Terminal.


e.    Click OK and press ENTER. You are now able to configure R1.


[ENTER]


Step 2: Enter privileged mode and examine the current configuration.
You can access all the router commands from privileged EXEC mode. However, because many of the privileged commands configure operating parameters, privileged access should be password-protected to prevent unauthorized use.
a.    Enter privileged EXEC mode by entering the enable command.
Router> enable
Router#
Notice that the prompt changed in the configuration to reflect privileged EXEC mode.


b.    Enter the show running-config command:
Router# show running-config

c.    Display the current contents of NVRAM.
Router# show startup-config
startup-config is not present


Part 2:   Configure and Verify the Initial Router Configuration
To configure parameters on a router, you may be required to move between various configuration modes. Notice how the prompt changes as you navigate through the router.
Step 1:  Configure the initial settings on R1.
Note: If you have difficulty remembering the commands, refer to the content for this topic. The commands are the same as you configured on a switch.
a.    Switch# configure terminal
Switch(config)# hostname R1
R1(config)# exit
R1#


b.    R1# configure terminal
Enter configuration commands, one per line. End with CNTL/Z.
R1(config)# line console 0
R1(config-line)# password letmein
R1(config-line)# login
R1(config-line)# exit
R1(config)# exit
%SYS-5-CONFIG_I: Configured from console by console
R1#


c.     Verify that console access is secured.
Exit privileged mode to verify that the console port password is in effect.
R1# exit
Switch con0 is now available
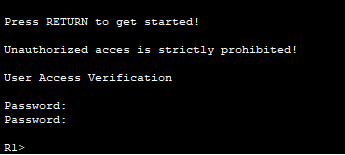
Press RETURN to get started.


d.    User Access Verification
Password:


e.    Use the following passwords:
Console: letmein
R1>


f.     R1> enable
R1# configure terminal
R1(config)# enable password cisco
R1(config)# exit
%SYS-5-CONFIG_I: Configured from console by console
R1#


g.    Enter the exit command again to log out of the switch.


h.    Press <Enter> and you will now be asked for a password:
User Access Verification
Password: letmein

i.      The first password is the console password you configured for line con 0. Enter this password to return to user EXEC mode.

j.      Enter the command to access privileged mode.
k.    Enter the second password you configured to protect privileged EXEC mode.

l.      Verify your configurations by examining the contents of the running-configuration file:
S1# show running-config

m.  R1# config t
R1(config)# enable secret itsasecret
R1(config)# exit
R1#

n.    R1# show run

o.    R1# config t
R1(config)# service password-encryption
R1(config)# exit

p.    R1# config t
R1(config)# banner motd "This is a secure system. Authorized Access Only!"
R1(config)# exit
%SYS-5-CONFIG_I: Configured from console by console
R1#


q.    R1# exit

r.     Press ENTER; you should see the following message:
Unauthorized access is strictly prohibited.
User Access Verification
Password: letmein

s.     Enter the second password you configured to protect privileged EXEC encrypted : itsasecret.

t.     R1# copy running-config startup-config


u.    R1 #Show flash


v.    R1# copy startup-config flash
Destination filename [startup-config] ? ENTER
R1#show flash

w.  Verify that all of the parameters configured are recorded. If not, analyze the output and determine which commands were not done or were entered incorrectly. You can also click Check Results in the instruction window.

Hasil :


Senin, 01 Juli 2019

2.1.4.6 Packet Tracer - Navigation the IOS

Step 1:      Connect PC1 to S1 using a console cable.
a.       Click the Connections icon (the one that looks like a lightning bolt) in the lower left corner of the Packet Tracer window.

b.      Select the light blue Console cable by clicking it. The mouse pointer will change to what appears to be a connector with a cable dangling from it.
c.       Click PC1. A window displays an option for an RS-232 connection.

d.      Drag the other end of the console connection to the S1 switch and click the switch to access the connection list.

e.       Select the Console port to complete the connection.

Step 2:      Establish a terminal session with S1.
a.       Click PC1 and then select the Desktop tab.
b.      Click the Terminal application icon. Verify that the Port Configuration default settings are correct.
c.       Click OK.

d.      The screen that appears may have several messages displayed. Somewhere on the screen there should be a Press RETURN to get started! message. Press ENTER.
What is the prompt displayed on the screen? S1>

Part 2:             Explore EXEC Modes
In Part 2 of this activity, you will switch to privileged EXEC mode and issue additional commands.
Step 1:      Enter privileged EXEC mode.
a.       At the prompt, type the question mark (?).
S1> ?

S1> t?
S1> te?
S1>?

b.      Type en and press the Tab key.
S1> en<Tab>

Step 2:      Enter Global Configuration mode.
a.       When in privileged EXEC mode, one of the commands starting with the letter ‘C’ is configure. Type either the full command or enough of the command to make it unique. Press the <Tab> key to issue the command and press ENTER.
S1# ?


S1# configure

b.      This is called global configuration mode. This mode will be explored further in upcoming activities and labs. For now, return to privileged EXEC mode by typing end, exit, or Ctrl-Z.
S1(config)# exit
S1#

Part 3:             Set the Clock
Step 1:      Use the clock command.
a.       Use the clock command to further explore Help and command syntax. Type show clock at the privileged EXEC prompt.
S1# show clock

b.      Use the context-sensitive Help and the clock command to set the time on the switch to the current time. Enter the command clock and press ENTER.
S1# clock<ENTER>

c.       The “% Incomplete command” message is returned by the IOS. This indicates that the clock command needs more parameters. Any time more information is needed, help can be provided by typing a space after the command and the question mark (?).
S1# clock ?
d.      Set the clock using the clock set command. Proceed through the command one step at a time.
S1# clock set ?


e.       Based on the information requested by issuing the clock set ? by using the 24-hour format of 06:08:00. Check to see if more parameters are needed.
S1# clock set 06:08:00 ?

f.       Attempt to set the date to 01/31/2035 using the format requested. It may be necessary to request additional help using the context-sensitive Help to complete the process. When finished, issue the show clock command to display the clock setting. The resulting command output should display as:
S1# show clock
*6:18:4.9 UTC Sat Jun 29 2019

g.      If you were not successful, try the following command to obtain the output above:
S1# clock set 06:08:00 29 Jun 2019

Step 2:      Explore additional command messages.
a.       The IOS provides various outputs for incorrect or incomplete commands. Continue to use the clock command to explore additional messages that may be encountered as you learn to use the IOS.
b.      Issue the following command and record the messages:
S1# cl
What information was returned? % Ambiguous command: “cl”
S1# clock


What information was returned? % Incomplete command.
S1# clock set 25:00:00
What information was returned?
S1#clock set 25:00:00
% Invalid input detected at ‘^’ marker.
S1# clock set 15:00:00 32
Hasil : 


Referensi : https://itbeginner.net/2-1-4-8-packet-tracer-navigating-the-ios-instructions-answers.html